Wednesday, December 12, 2012

Updates....

So, it's been an eternity since I have posted anything.  My computer stopped working and I HATE posting from my phone.  But, I finally got a brand, spankin new laptop, so I promise to be more faithful from here on out.

I didn't get to finish my homemade Halloween series, so here are some pics just to wrap it all up...

All the kids ready to go out.

Our table.  I made zombie hotdogs, and
"pizza fingers" to dip in "blood".  (Crescent rolls filled with mozzarella and pepperonis with pizza sauce to dip them in.) and we also ordered some pizzas and made potato salad. A weird combo, but it seems like everyone liked it...

I made two kinds of cupcakes.  One is a pumpkin spice, I just used a boxed cake mix and added 2/3 of a cup of pumpkin puree (NOT pumpkin pie filling) and added about a teaspoon of pumpkin pie spice and topped them with cream cheese frosting.  The other is a hot chocolate cupcake, I added some white chocolate chips to a chocolate cake mix (to represent the marshmallows) and about a teaspoon of cinnamon (like the Mexican hot chocolate), and also topped them with cream cheese frosting.

Some Halloween cookies, it's hard to tell with this pic, but they are Halloween shapes.  I just use a sugar cookie recipe and add chocolate chips for cut out chocolate chip cookies...

Our hostess, my sister-in-law, colleen.

Colleen made this spider out of dollar store trash bags, it actually looked pretty cools and the kids were a little scared of it...

The kids playing the bean bag toss game from a few posts back. I guess they decided to add their own little twist, my niece, Nadalee, was swinging those swords and blocking tosses.  And the little princess was just in the way lol...

Me and my sister-in-law.

So, now I am working on Christmas.  And I just want to give some advice.  Stop trying to live on credit and buying bigger and better things that you can't afford.  There is so much more to life than having the best and coolest things.  I'll admit, I spent A LOT of money on Christmas, BUT we could afford it.  And we're just middle class, not upper middle class, but we are smart with our money.  We don't live outside our means.  We have no credit cards, not that credit cards are bad, we just don't need them.  We make smart choices when it comes to things we want to have.  We don't go out and buy the best and most expensive things, unless we have saved the money for it.  Saving money, that's where I was going with this.  All the money that I spent for Christmas we saved, for months!  We saved nearly $1,000, by just saving what we could each week, until Black Friday when I went out and got some awesome deals.  Don't go apply for a credit card to buy presents for the kids, if you didn't save money, just spend what you can afford and still be able to pay the bills.  Your kids will appreciate the skill you teach them of wisely spending and saving money more than a toy they MIGHT play with for a couple of months before they lose it, break it, or forget about it.  Anyway, I will now step off my soap box, I just hate seeing people spend money that they don't have...

I love giving kids something homemade for Christmas and birthdays.  They absolutely love it.  It doesn't matter what it is,  my kids got all excited just because I let them pick fabric from my stash! :)  But this is what I made.

These are crayon rolls.

Here's the inside they're, super cute.
 
I got the tutorial here. On some of them I used a lace edging and a ruffle on others.  These are going to be stocking stuffers for my kids, and I am going to make some more to give to my nieces and nephews too.
 
 
When it gets a little closer to Christmas I am going to make some chocolate truffles to give to each family on my honey's side, I'll post those recipes at that time.  Until then, stay warm y'all

Monday, October 1, 2012

Homemade Halloween, Tres

Hey y'all,
It took me a while to get around to this, my pc isn't working and I wasn't exactly looking forward to posting from my phone, but I do NEED to share with y'all what I've been up to...

First, for a costume. My daughter, Dolores, wanted to be a pumpkin and this is what we came up with...

And I also finished a game for our Halloween party. It's a bean bag toss game. I've been saving a couple cans, try and use pop top ones but definitely don't such your hands inside the cans, turn then over to dump out the bean bags.

And last, but not least, I made some homemade soft pretzels and they were amazing. I got the recipe from foodnetwork.com here
The picture is ugly, but they tasted delicious!

That's out for now y'all!


Friday, September 21, 2012

Homemade Halloween, Part the Second

Hey y'all,
So I have the second installment of Homemade Halloween for ya.  But first, let me tell you what I have been up to.

I literally spent hours baking last night, to make 3 dozen cookie cups for, my baby, Albert's kindergarten class.  Today they had an ice cream party to celebrate completing the alphabet, so I baked cookie cups for them to put their ice cream in.  I originally got the idea on pinterest and I experimented with them a couple months ago.

This is the picture from pinterest.  However, mine didn't exactly turn out like this.


Here are my cookie cups.  They still turned out pretty good.  And I used the rest of the dough to cut out letters, since they were celebrating the alphabet.

I found that used I thicker dough that you can roll out and cut shapes with works best.  You can find my own, original recipe here.  And all you have to do is roll out the dough about a 1/4 inch thick and use a circle cookie cutter, or a cup or anything else, to cut circles.  Make sure you grease your cupcake pan REALLY good, because they can still be difficult to get off even if you slather it in butter (I prefer to use butter over sprays, I heard it is better for your pans and you don't get any funny tastes.). Cut circles that don't completely cover sides of the cups when you flip your pan over, make them a couple centimeters from the bottom because gravity will make them droop down to the bottom.  Then you just bake them until golden brown, you just have to watch them but mine took around 12 minutes to bake...

Here's Albert's class.


And here's my baby enjoying his well-deserved ice cream.  Doesn't that ice cream look delicious in it's little cookie bowl.  The cookie cups were a huge hit!

And here's our favorite teacher, Mrs. Melcher, she also taught Albert's big brother, Fernando..  (She said the "k" tastes like a "k") 

And you know those funky colored ones, everyone told me they looked like play-doh and I said, "You watch, I betcha the kids eat all of those.  And guess what,


they did! I was worried they were going to start fighting over them.  But Mrs Melcher warned them, "You get what you get and you don't throw a fit!"

Anyway, so on to Homemade Halloween stuff.  Today I made Albert a costume.  So, you know the video game "Zelda"?  I THINK I remember my mom telling me that Zelda was the name of the princess on the game and that the guy in green is named Link.  But I don't know for sure and I never really have been to into video games.  But we'll go ahead and say I'm right and call him Link.  So Albert wanted to be Link for Halloween.  So today we went to Goodwill and got him a green shirt for men, some brown pants (for girls ;]) and a belt all for $8.

 And here's what we came up with!  It's much cuter in person. So, I probably should have just gotten him a boy's shirt that was a couple sizes to big, but as soon as I walked into the store I saw a shirt in the perfect color green and I DO NOT like rummaging through all the clothes at Goodwill.  So I just grabbed it. So I had to hem the sleeves and the bottom hem of the shirt because it was just a bit longer than it needed to be.  But because I bought a shirt that was way too big, I had plenty of extra fabric to make his hat.


I didn't get a picture where you could see the hat really good, but I pretty much just sewed 2 triangles together and it turned out great!  You may have noticed the boots (also for girls).  They were an extra $6, but once he saw them, there was no convincing him I could make him cool pretend boots out of fabric.  So I went ahead an bought them.  Eh, what's $6 (a soda and a cheeseburger, if you didn't know).  He was happy and that makes me happy!

I'll holler at y'all later!
-Ashley


Saturday, September 15, 2012

Homemade Halloween; Part 1

Hey guys!  So y'all know how I love fall, so of course, I have to start getting ready for Halloween!!

This weekend I made some costumes for nieces.


First up, a Ladybug! You can't see her antenna too well in this pic, but I even made those with stuff from my stash and put them on a cute little hairbow.  My poor lady bug was trying so hard not to smile, she's self concsious about her front teeth that are barely starting to grow back :(


I made little yarn pom poms and then I covered flower wire with the black yarn and hot glued the ends.  I even found that cute little lady bug button in my stash! You never know what you'll find raiding your own house.  I found everything for my youngest son's costume (He's going to be a scarecrow to match my niece at the bottom, they're going to be soooo cute! I can't wait to get pics!!!)


I saw this pic on pinterest.  I use to buy a little pom pom maker and I would always lose it and have to buy another, but you can just use a fork (which is what I did.)


And, my adorable scarecrow. (I think I blinded her with the flash, sorry!) Everything, except the tulle to make her dress, I found around my house! And the dress, just an extra long tutu with a ribbon tied right below her "bust".  I know, I know, she doesn't really look much like a scarecrow. but wait until you see her with her face painted...

  So we're going to have this kick-ass Halloween costume at my sister-in-law's house, I mean, that's if some people actually show up... But, if they don't, I guess more candy for us!

But I have so many great ideas, I'm so excited!  So, each week I'll show you guys what I'm making leading up to the big event on October 31st, when I'll have lots of pics to share with y'all!

Happy Autumn, y'all!

Saturday, September 1, 2012

Count your many blessings name them on by one

     Hey y'all, I have been so busy with making cakes and getting my kids from here to there and just life in general, that I realized yesterday that I was letting my house fall down around me.  So I spent the ENTIRE day, literally the entire day, cleaning. And I'm satisfied that I got every room and even the outside of my house clean.  I even planted some shrubs that have been hanging out in planters in front of my house for a couple weeks and put out a couple fall decorations.
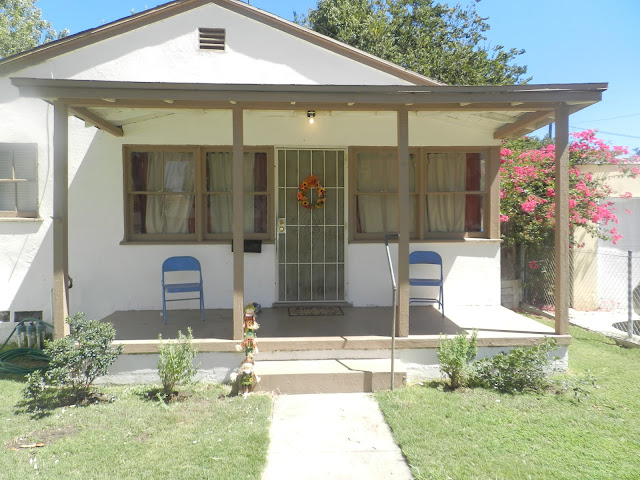
This is the first time that I have actually wanted a picture of my house.  It took me almost 6 months to finish painting it (I had to do it ALL by myself and I still had to cook, clean, do laundry, and work) But I think that all my hard work is paying off. 
This is a fall wreath that I made with supplies from Dollar Tree. I think it turned out pretty good.  I'm always pinning wreaths on Pinterest but this is the first one that I've actually made.

     Today, while I was doing all this work around my house I had a lot of time to think.  For the last couple months I've been wanting to go back to Texas (where I am originally from and where I met my boo) because our house in Texas is much bigger than this one here in Southern California.  It's not just that I want a bigger house, our home is too small for our family, it's only a 2 bedroom and one bath for our family of 5. (Of course, in February we will be converting the garage into an additional bedroom),  But because of circumstances, we had to come out here.  So a couple days ago, I prayed that God would either make it possible for our family to return to our home in Texas, or to make me content with our home here in California.
    I'm sorry to tell you family and friends, that while I was cleaning and working today, I realized that God had filled my heart with a contentment with our home.  We are a very blessed family.  My husband has a decent job, but we're definitely middle class, probably even lower middle class.  But Bobby was once a professional athlete and made enough money to buy some assets, houses and cars, and because God blessed us in this way, we're able to live quite comfortably.  It may be a tiny, old house, but I know that there are people who have bigger houses and envy us because our house is payed for.  And that makes it possible for us to get and do a lot of things that we otherwise may not be able to afford.  It makes it possible for me to try and build a cake business from home.


    This Bible verse has been on my mirror for years (and that picture too, but my babies were so cute I don't want to update it yet lol) I kind of lost touch with the meaning, that God provides what we need and if we don't have it, God will carry us through without it.  It's so easy for us to get caught up in the "American Dream," which seems to have become "Get more and bigger stuff" and keeping up with the Joneses, and we often forget about all we got.  I once read about a woman who thanked God every time she walked into a room in her house for that room and everything/everyone in it.  I'm thinking about making some kind of little signs to remind me to be thankful for my little blessings every day. Especially those little blessings in the picture :)
    But, even with all the cleaning and working I've been doing today, I still had time to bake a delicious treat for my best friend, just as a blessing.

Red Velvet is her favorite so I made her a couple dozen since we haven't got to spend much time together lately, being busy moms.

Take care y'all!

Wednesday, August 29, 2012

It's Fall!!

     I LOVE fall! Technically, I guess you can't call it fall yet in southern California, it was 108 degrees today! But I'm hoping that if I believe it enough, I can make it be fall anyway! lol  So, I haven't blogged in a minute, I've been soooo busy.  Wanna know what I've been up to?

This is the cake I made for, my niece, Vidal's 8th birthday.  When I was asking her what kind of cake she wanted, she kept telling me all this boy stuff because she spends so much time with my boys, but I knew she didn't really want that.  But she definitely isnt' girly, so we came up with the idea of a zoo cake because she likes animals.


All the birthday party guests, a.k.a. my kids and their cousins. At the top is Nadalee. On the second row, from left to right, is Crissa, Vidal, and my son Fernando. And the bottom row, left to right, is my baby Albert, Audrina, Giselle, and Little Armando.I think they had a good time.

I also spent last weekend making Halloween cupcakes (I told you I was trying to make it be fall around here!) to put on my facebook page (facebook.com/sugarandspicesb). 


And I made my fall centerpiece for my table. The flowers and vase are all from Dollar Tree, there's these cute flowers on the side you can't really see that have little butterflies and they are so cute.  The Scarecrow picks I had from last year, I bought them at The 99 Cent Only Store. And I also had the pumpkins and pine cones from last year, they were purchased as a set from Wal- Mart for $4.97.  This weekend I'm going to "Autumnize" my porch and front yard, I think it'll be acceptable since it's September, even though we were invited to go to a pool party this weekend as well. lol
     And I want to share this recipe, I think of it as a fall recipe, for Bacon Maple Cupcakes.  Don't get scared because of the bacon, it tastes like pancakes and bacon and they are delicious.  You can get my recipe from scratch here. But you can go semi-home made and add maple extract to a box yellow cake mix, and substitute the vegetable oil with half butter and half bacon drippings, and fold the candied bacon in just like the recipe given.


Oh, and I almost forgot.


Fall Cakepops Centerpiece! I Think I might make another of these when its Thanksgiving and add some Turkey Cakepops to it as well!

Well, Happy Fall Friends!

Saturday, July 28, 2012

DIY Flirty Apron

I haven't blogged anything in a while, I have been sooo busy with home improvement, my cake business, and 3 kids I really have no free time these days.  But I really wanted to share this project.

Ok, I no I should have taken a pic of some one wearing it, and I had a pic of myself in it but I don't like pictures of myself lol But take my word for it, it's super cute when you wear it!  The best part is that it only cost $8 to make! But it is pretty time consuming, especially if you have men and children to attend to, but it's not difficult to make.

Here's the materials you will need:

Materials
1 cheapo plasticy canvas type apron (I got mine from the 99 Cent Only Store)
1 fat quarter bundle (Wal Mart has a pretty cool selection for $7.47, which is where I got mine)
Neutral thread to match your material
Needle (Yes, there is some hand sewing in my instructions, but will get to that later)
Scissors
Ruler

And here are the pretty simple instructions, I wish I had taken pictures, but hopefully I can thoroughly explain.  The cool thing about this easy apron is that you don't really have to perfect. In most patterns, if you don't measure just right, it will throw the whole thing off, but you can't really mess up this one, just make sure you get the width of the ruffles right so they will overhang each other correctly.

Instructions

1. Start by measuring your apron. From the waist down, you want the apron to be 12 inches long, mine was a little longer so I cut it and hem it.  The cool thing is, you don't have to hem it perfectly because you can't see the bottom of the apron, so just do a rough cut, fold, and stitch it up.
2.  The next thing you want to do it make the fabric strips that will turn into ruffles.  Now, don't worry about exact measurements here.  The fat quarters that I got were about 23 inches wide and about 18 inches long.  So you want to to cut 6 inch strips lengthwise from your quarters. This is a diagram of what I mean, the red lines are the cuts you are going to make.  So from each piece of fabric, you will have (2) 23 inch long and 6 inch wide fabric strips.  Sew the 2 strips together so that you have one 46"x 6" piece of material. Do this for each pattern so that you end up with 4 fabric strips to make ruffles.

 
3. Now, hem the sides and bottom of each strip, leaving the top unfinished. 
4. Here's the hand sewing part.  It's the only way I know how to do ruffles.  Fold the top of one of the fabric strips over a quarter inch, thread your needle with a about 2 feet of thread. Start a running stitch along the fold at the top of a fabric stitch and go for about 5 mm and then pull the sting tight, do a back stitch to lock and continue for the rest of the length of fabric.  I was told that you can loosen the bobbin tension on your machine and stitch to parallell lines for the length of the fabric, don't lock them with a back stitch, and then pull the bottom (bobbin) strings of each stitch so that the fabric scrunches then tie the two strings together to lock the stitches.  This technique didn't work out too well for me, but that's no reason you shouldn't try it.
5. Repeat step 4 for each fabric strip so that you have 5 scrunched fabric strips.
6. Next, figure out where to attach your ruffles to your apron.  The first will go at the waist line (I like to draw dotted lines to help keep everything straight.)  The next ruffle will go 4 inches down from the first ruffle and so forth so that the last ruffle should lay pretty much on the hem line (It's ok to put it a little higher, you won't see it.  So when you attach the ruffles, each should over lap the next by about 1 inch.  Then you just straight stitch your ruffles in place.
7. Now, for the waist band and ties.  I didn't have enough of any one material to make the ties as long as I wanted them ( you can make them as long as you want, just be sure you'll be able to tie them so I made a patchwork waistband.  I cut 3 inch wide strips our of the the remaining fabric and then cut them down to 2"x3" rectangles. Here's another lovely diagram.  The top 2 rows are the strips already cut out for the ruffles, the bottom 2 are the rectangles for the patchwork waistband.
8. Place 2 rectangles, right sides facing each other and sew the 3" inch sides together, repeat so that you have a strip that is however long you want it and 3 inches wide. Then fold the entire length in half long ways so that the right sides are facing each other again and sew the entire length.  Then flip right side out, (This was a little tricky, I tied about 2 feet of thread to a safety pin and then ran the safety pin through the inside of the strip then attached it to the other end while holding the loose end of the thread [in my teeth lol]. then started pulling the safety pin back through the middle so it was right side out). Then iron flat your strip of material so that the seem is in the middle of the back side and hem the two ends. Then just straight stitch it on your apron, just barely overlapping the top of the first ruffle.

And there you have it, it may look like a lot but I know there are people out there like me who need very particular instructions.  So good luck!

Monday, July 16, 2012

Pallet Table

This is the pallet I saw on pinterest.
     I've been super busy for the last couple days. I was inspired to make my own patio table. We have lots of those old metal fold up chairs and we have some pretty nice wooden furniture we bought for pretty cheap off this lady driving around our neighborhood selling her homemade furniture, but we just didn't have a table.  I've been wanting to buy a patio table, but they can be pretty expensive, so when I saw a cute little table made out of recycled pallets I knew I HAD to make one.

     So my sister-in-law, Colleen, and I went on a covert mission to find pallets to use.
the pallets we "found"

And then we got busy with construction


This is my table before being sanded and painted, and that's my brother-in-lawm Colleen's husband, in the back ground
And this one is Colleen's unfinished table.


Here are my finished tables on my patio with my old metal chairs that got a fresh coat of blue paint.


And these are the wooden chairs that I painted and made cushions and pillows for.


This is what my boo (left) and his brother, Jon Jon, were doing instead of helping me with any of this lol


And here is Colleen's finished table


     The tables were really easy to make, just got 4 pallets, a 4x4x8, "L" brackets and nails.  Cut the 4x4 into 8 one foot long sections for the legs of the 2 tables and use the "L" brackets to attach.  But they were a pain in the you know what because of all the spaces and hard to get to places that had to be painted.  But I'm happy with how they turned out and I'm ready for cooler weather to enjoy our new tables (: